
Introduction
In this post I will be detailing a simple Code Stream pipeline that will build a new Centos7 template using Packer. The key points to this blog post are as follows:
- Use of Code Stream pipelines to organise sequential and parallel tasks
- Use of Packer to create a Centos7 virtual machine
- Published pipeline in to the vRA 8.3 Service Broker
- Use of Docker to contain our Packer build operations
Assumptions
I have made a few assumptions that you should note before we begin
- Github – you have working knowledge of Github, concepts around cloning repositories as well as setting up authentication tokens to enable scripted API access
- vSphere Access Account – we will be using the administrator@vsphere.local account to access our vCenter server
- vRA 8.3 – You have a basic level of understanding of vRA, for example, how to navigate around and get to different places in the UI
- vRA 8.3 Configuration – You have a configured vRA 8 instance with configure vCenter endpoint, compute resources ready for consumption and a project to associate our pipeline with
Pre-requisites
To get started, there are a few things that you will need.
- GitHub account with a public repository – This will be used to store the Packer configuration file and the kickstart file to enable to unattended Centos7 installation. This guide will not cover setting up the Packer configuration file or the kickstart file. If you want to adapt mine, you can find download links below.
- GitHub Access Token – An access token generated on GitHub that will allow us to access and clone your repository
- Docker Host virtual machine – The docker host will be used by our Pipeline in Code Stream to generate a container where Packer will run from. Sam McGeown has an excellent post on setting this up. I built mine using a Centos8 VM, following his instructions, albeit as this is in my lab and I wanted to keep things simple and quick to stand up, I did not follow his section on enabling communication over TLS. Ensure that your Docker host is added as an integration in Code Stream
- Builder Image URL – We need an image to use with Docker for our container. Sam Perrin has a made available a lightweight, Alpine based image that you can use
- vRA 8 – I am using a single node deployment of vRA 8.3
Sample Packer and Kickstart Files
The following GitHub repository can be used to demo this blog post. It contains a simple kickstart file and Packer Centos7 builder file. The Code Stream pipeline is also included in the repository and can be imported into your Code Stream environment. Note that setup per below and additional modification will be required to ensure it works correctly.
Hold up! Why Bother Writing This Post?
Writing articles on my blog gives me a follow up reference point for when I forget (cough..) how to do this later on. Why do it different though? Well, the fact is it may give me the change to sing ‘I did it my way’ under my breath, but I really wanted to have what I believed to be the simplest implementation example of Packer integration. Michael Poore has an excellent post where he has configured Code Stream and Packer to create templates for his lab environment. To provide the CentOS installer with its kickstart file, Michael uses NGINX to host the kickstart file on the Docker Host. This file is then loaded remotely by the CentOS installer. Rather than do this and to enable me to ‘go my own way’ [editor: a Fleetwood Mac reference? Really?], I decided to utilise a second ISO image containing the kickstart file. This ISO image can contain any files or directories that I would like available during the build of my template. This ISO is not built ahead of time, but rather taken care of by Packer. This means that I can add files and scripts to my GitHub repository and have them automatically added and executed as part of my template build process. Packer will build the ISO on demand for me. To do this, it requires an ISO builder to be installed in the Docker Container executing Packer. I take care of this in my pipeline with one line of Bash script. Simples…
Workspace and Input Configuration
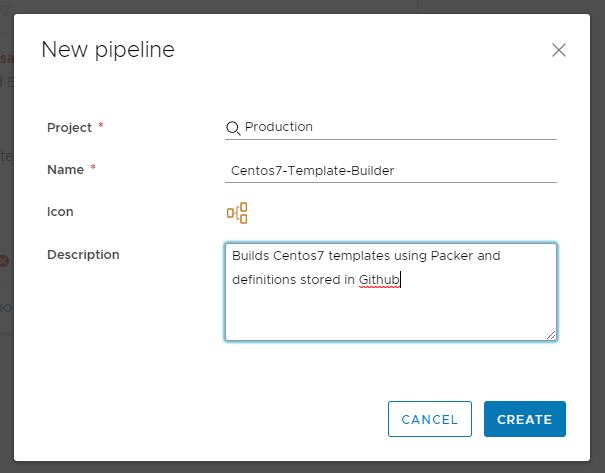
- Connect to vRA and from the Cloud Services menu launch Code Stream. From the sidebar, select the Pipelines option and click New Pipeline, Blank Canvas. Complete the information required by the popup dialog box. Click Create and you will be taken to the Pipeline design canvas

Create New Pipeline
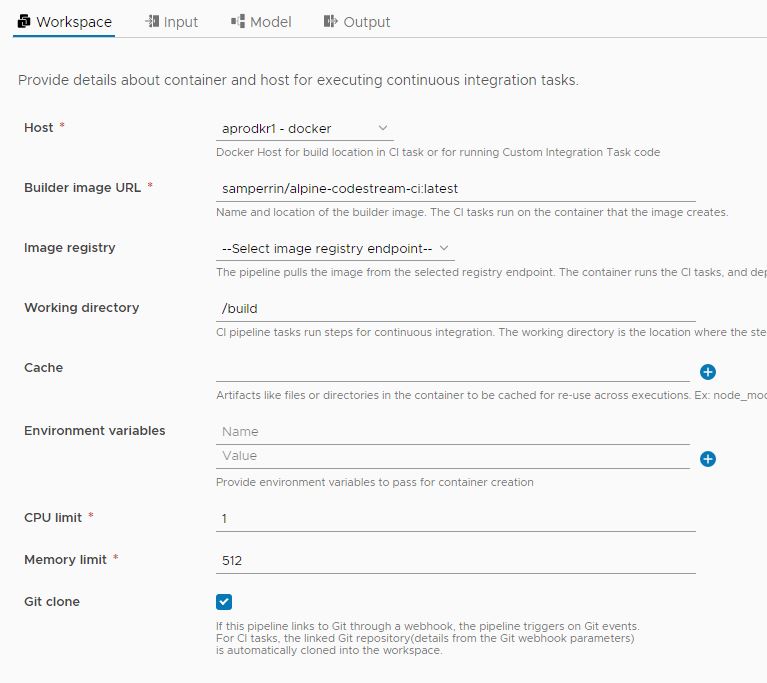
- When we are finished, your design canvas will look like the one in the screenshot below. In the meantime, click on the Workspace tab heading and complete the information as per the below screenshot. The information here configures the workspace for the entire pipeline. As you can see we specify the Docker Host in the Host field, the builder image url set to Sam Perrins image, the working directory is set to /build and the Git Clone checkbox is selected. All other controls are left with their default values set. When you have finished, click Save

Configure the Workspace
Click on the Input tab. The parameters that you add here are ‘inputs.’ Each inputs value can be adjusted when a pipeline is executed. We will be adding input parameters and including default values, as follows. Note that we are also going to be selecting the Docker radio option for the Auto inject parameters parameter. This will ensure that the input parameters we configure will be injected into our Docker container when our pipeline executes. When finished click on Save
| Name | Value | Explanation |
|---|---|---|
| GIT_REPOSITORY_PATH | https://github.com/pauledavey/AutomationPro_Packer_Centos7.git | This is full url to the Github repository that is hosting the Packer build definition and the kickstart file for the CentOS7 build |
| PACKER_FILE | packer_1.7.0_linux_amd64.zip | The Packer download that we wish to obtain for use |
| PACKER_URI | https://releases.hashicorp.com/packer/ | The base url for the Packer download. The full download url is constructed by combining the PACKER_URI + PACKER_VERSION + "/" + PACKER_FILE |
| PACKER_VERSION | 1.7.0 | The version of Packer that we are going to be using |
| REPO_FOLDER | source | This is the folder target within our Docker container that our Git repository will be cloned to |
| REQUIRES_PACKER | true | This flag indicates whether Packer should be downloaded and run. This flag enables me to disable all or part of the Pipeline for testing purposes |
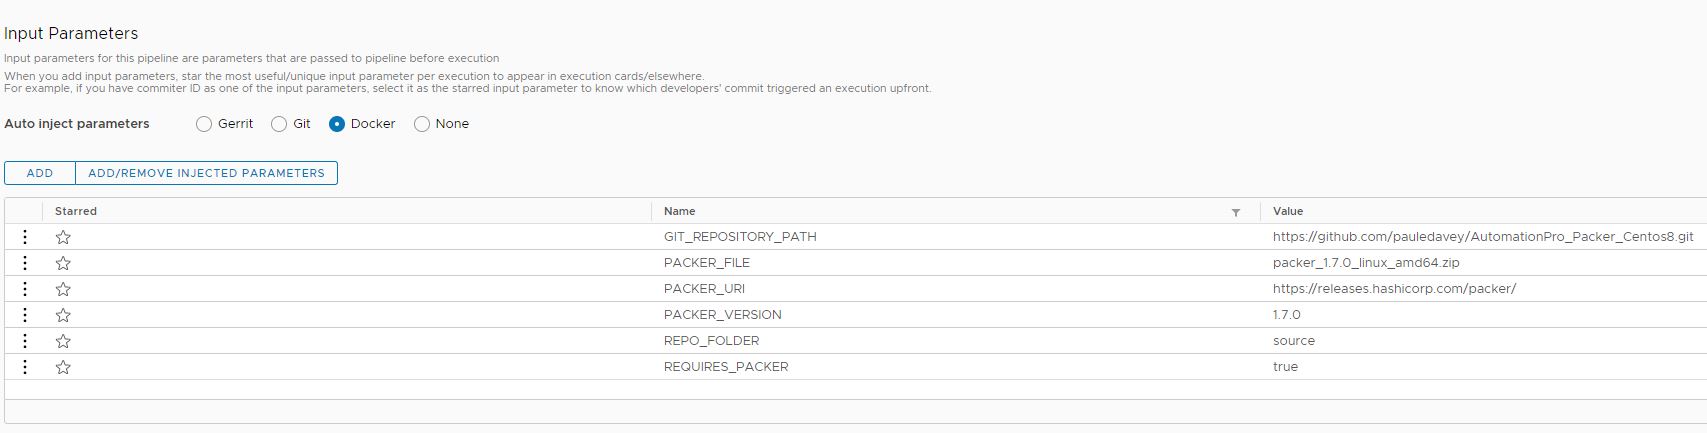
Provide Inputs with default values
Variables
We need to create three variables to obfuscate values that our pipeline will use. From the sidebar, click on Variables in the Configuration section. You can add a variable by clicking the New Variable button. Add three new variables using the details below.
| Type | Project | Name | Value |
|---|---|---|---|
| SECRET | Your project | ssh_password | the password that will be used to SSH into your Centos7 VM |
| SECRET | Your project | vcenter_password | Password for your adminstrator@vsphere.local account |
| SECRET | Your project | Github Access Token | Access token generated on Github |
| SECRET | Your project |
Developing our Model
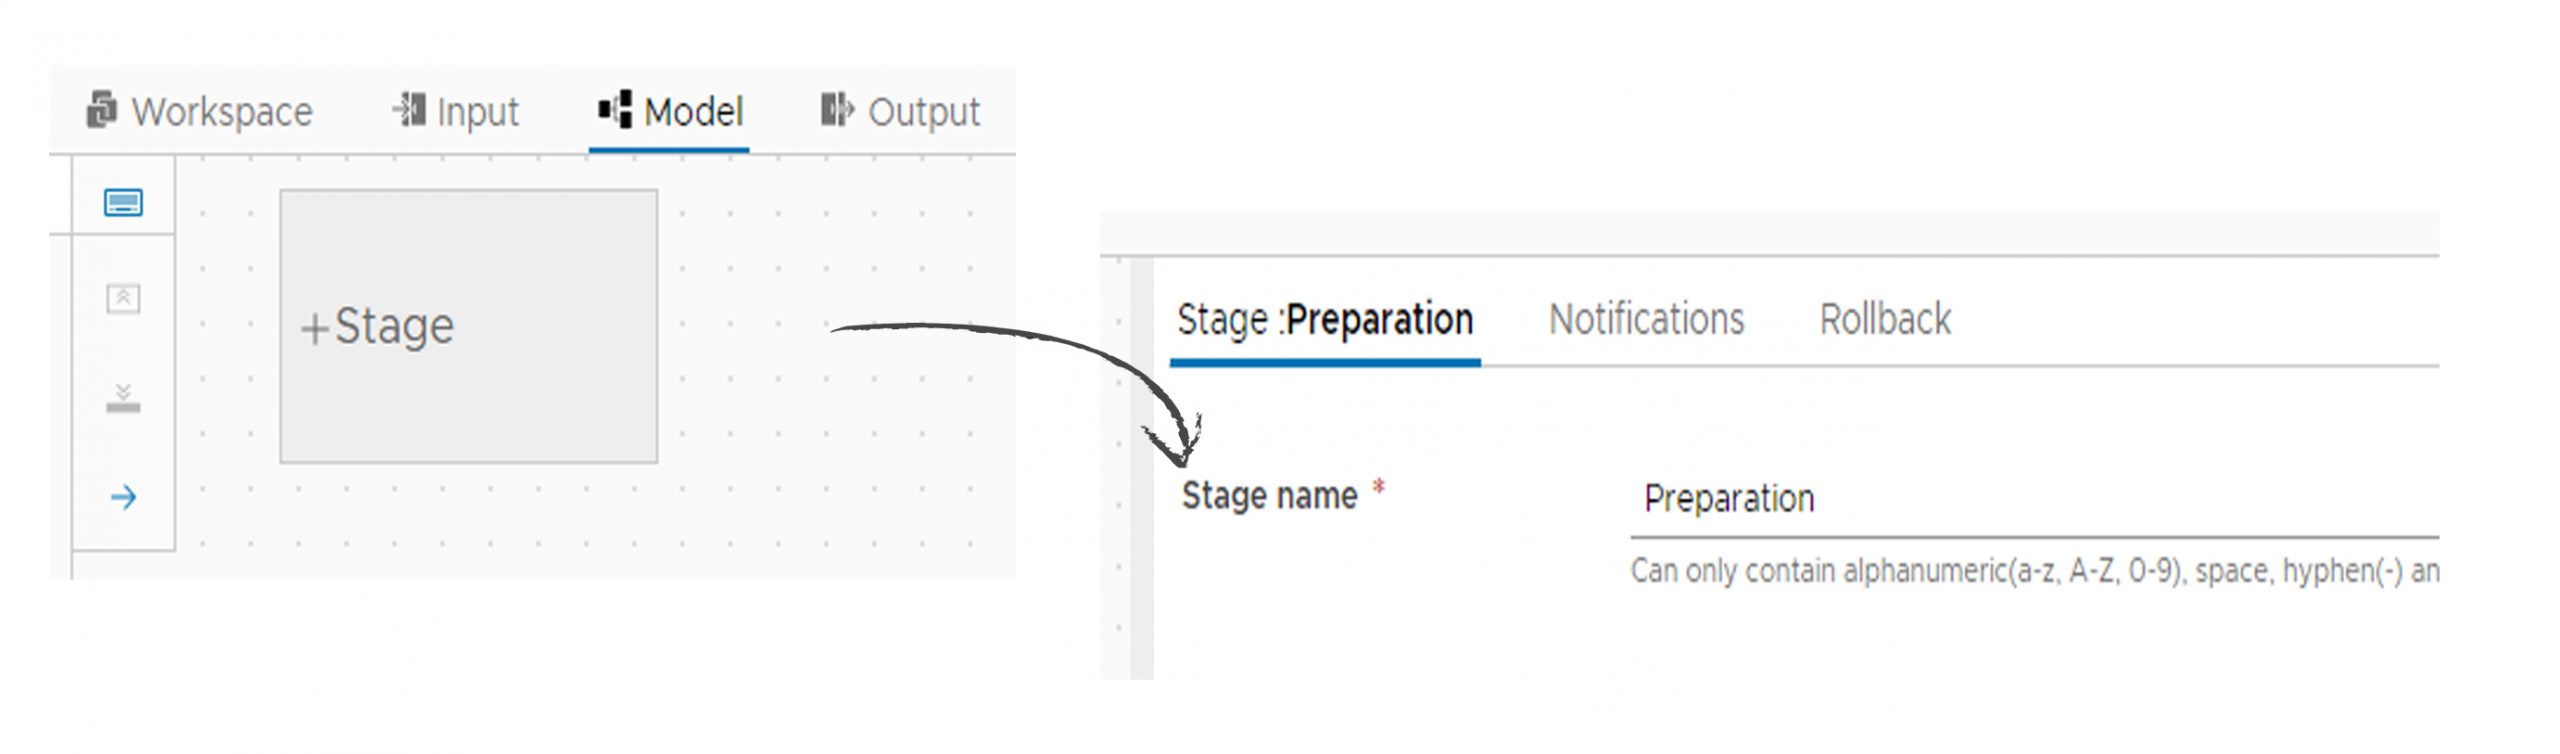
The Model view provides us a graphical interface to create, manipulate and edit our pipelines tasks. Click on the Model tab to get started
- Click on the empty Stage to create our first stage. Enter a stage name. I used Preparation, since I am going to do all the stand up tasks in this stage. Click Save

Add our first stage
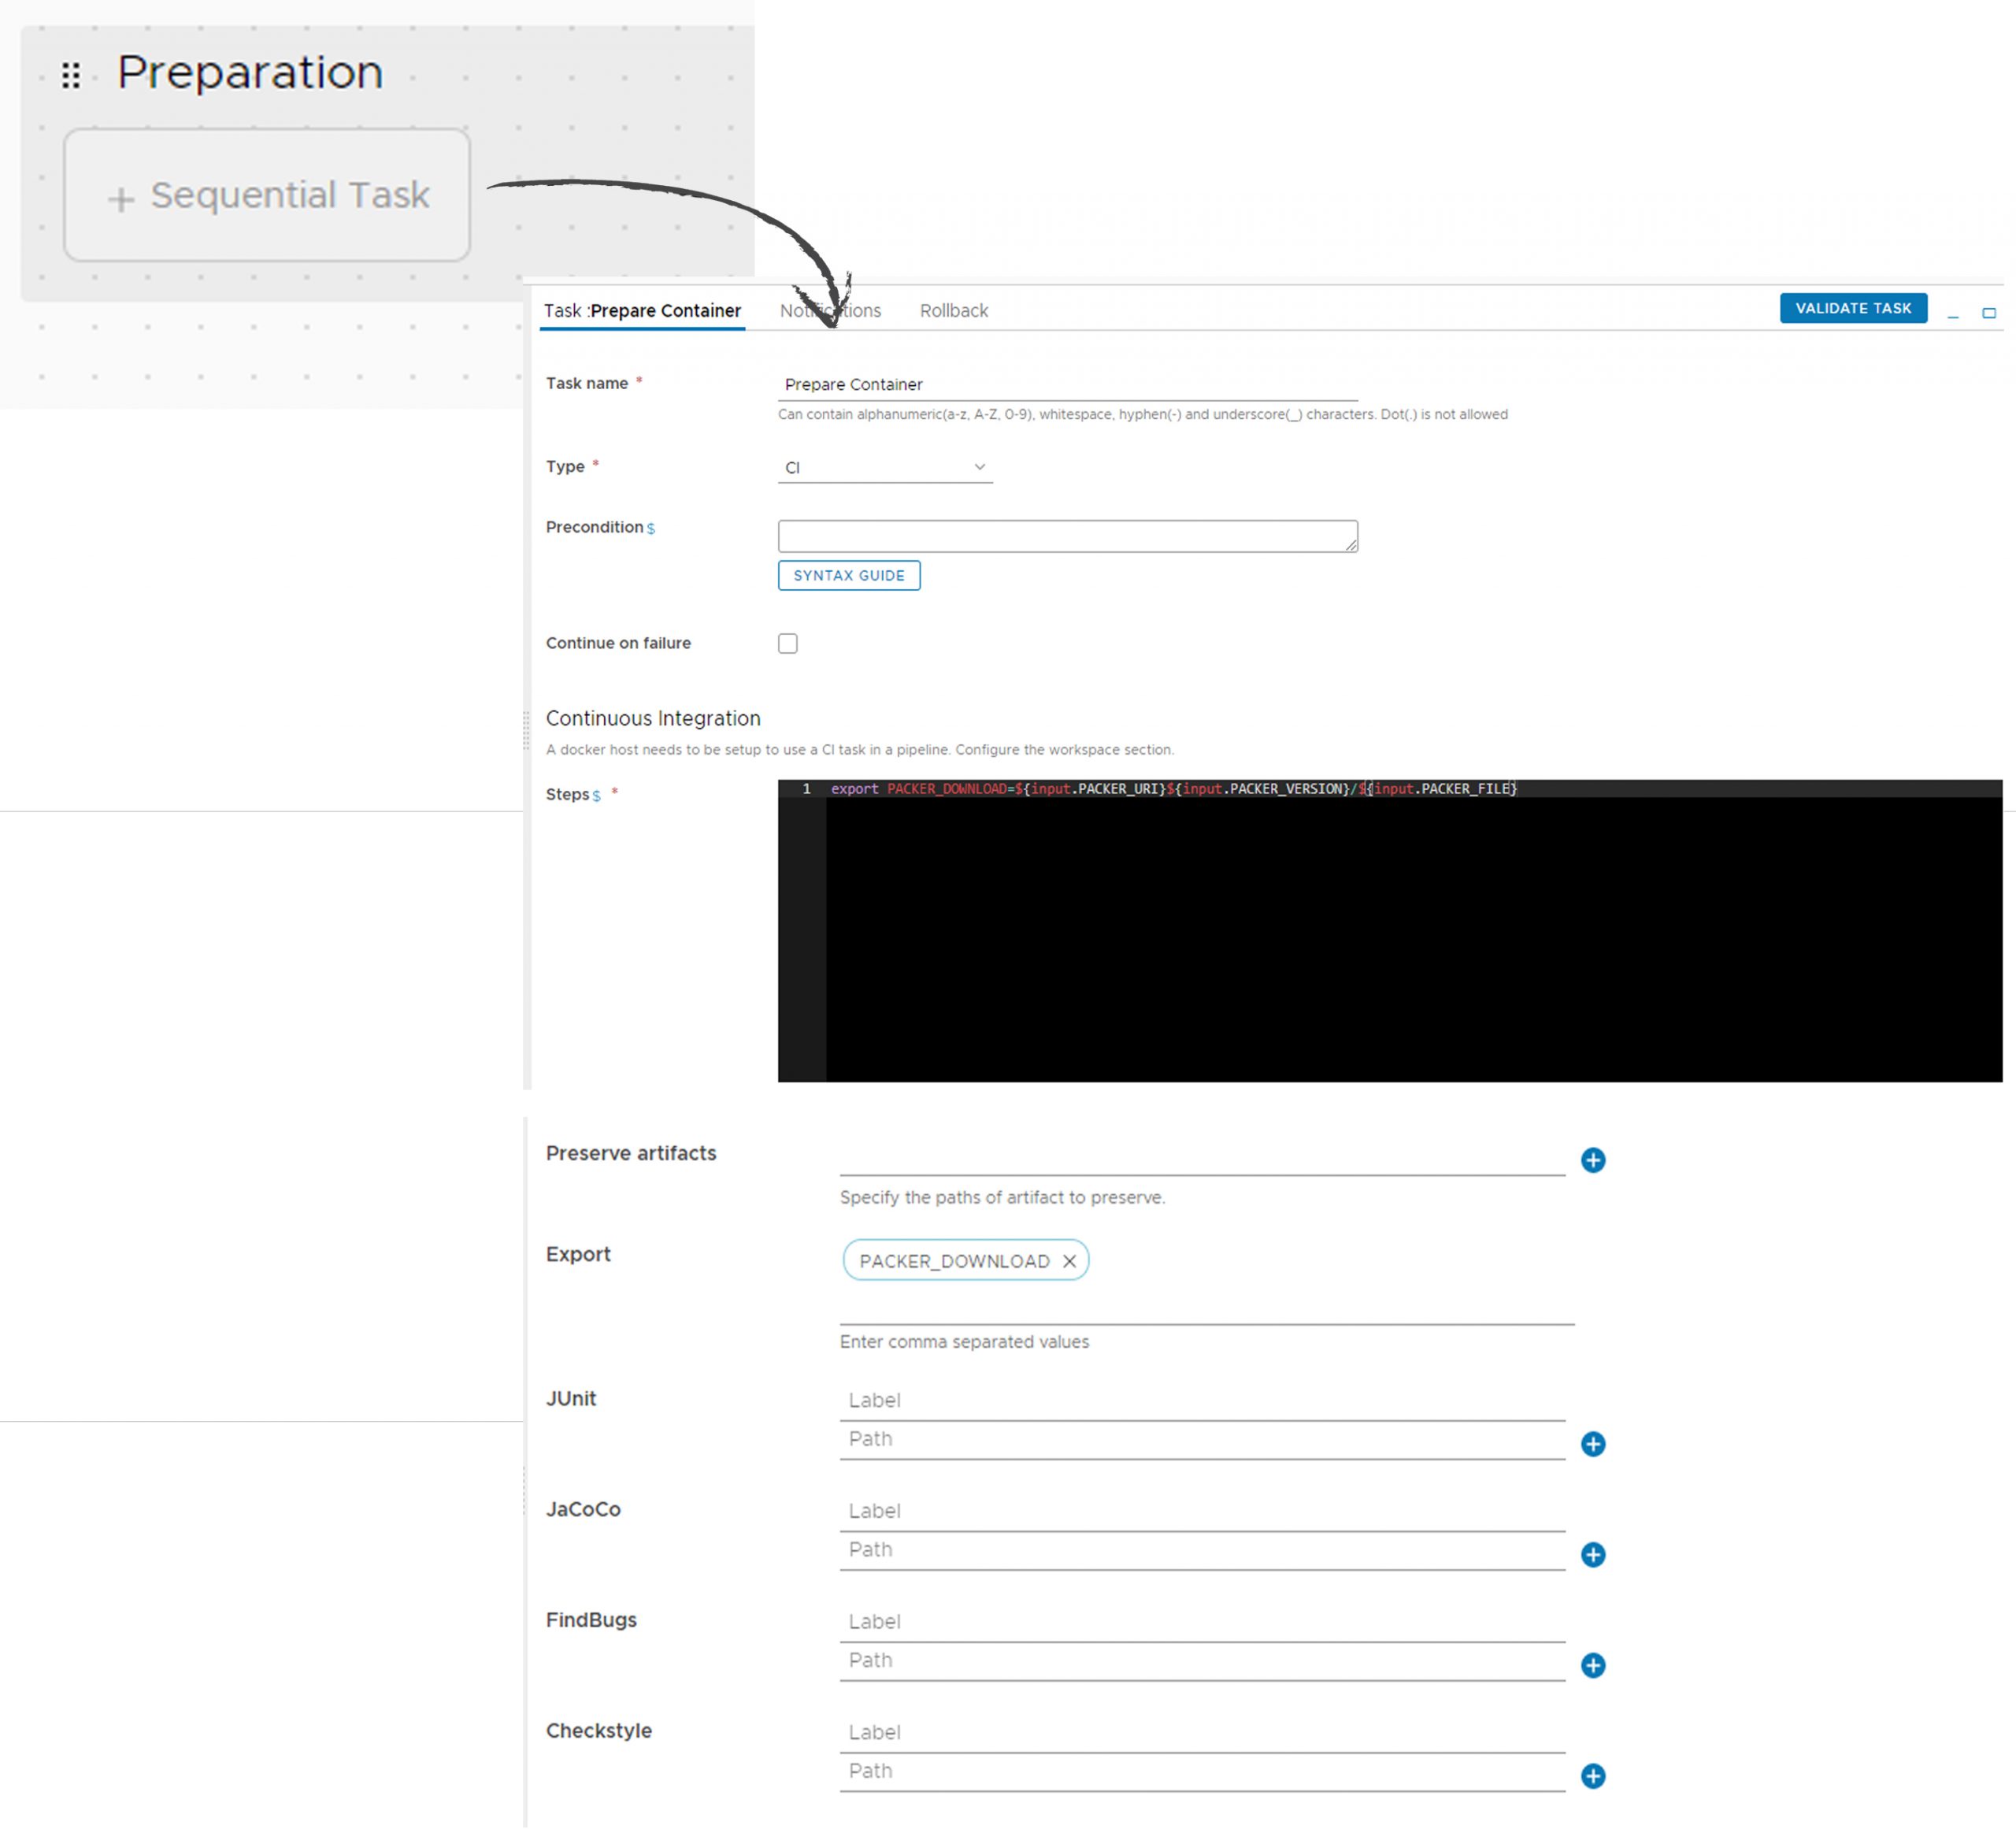
- Click the new Sequential Task placeholder. A new Task will be added to the canvas. We need to now configure this task as follows. When complete, click Save
Property Value Task name Prepare Container Type CI Steps export PACKER_DOWNLOAD=${input.PACKER_URI}${input.PACKER_VERSION}/${input.PACKER_FILE} Export PACKER_DOWNLOAD 
Initial Task of our first Stage
- From here on out, it is a case of adding additional Tasks and Stages to build the pipeline that we want. You have just learnt how to create a new Stage and a new Task. Using what you have learnt and the information below, build out the rest of the pipeline. I recommend doing it in the order shown in the below image. The information required for each additional Stage and Task are detailed in the below tables.

Carry on configuring the subsequent Tasks and Stages
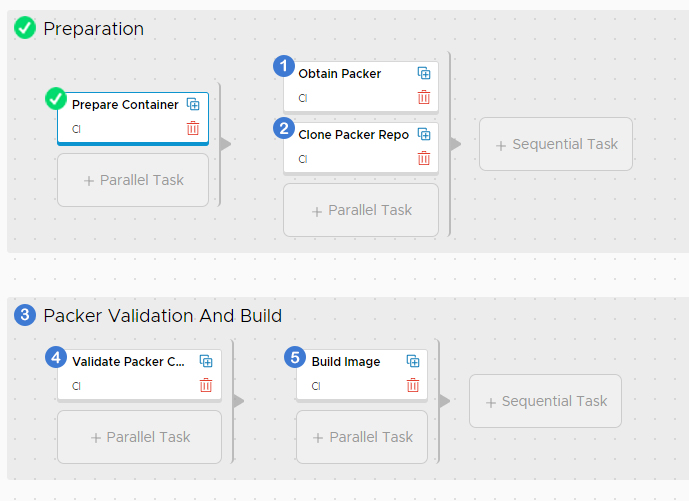
(1) Obtain Packer Task
The main purpose of this task is download and unzip packer. You will see in the Steps property that we add some bash code to download Packer using a new variable. This variable is what we configured as an export on the previous task.
| Property | Value |
|---|---|
| Task name | Obtain Packer |
| Precondition | "${input.REQUIRES_PACKER}" == "true" |
| Type | CI |
| Steps | curl -O ${Preparation.Prepare Container.output.exports.PACKER_DOWNLOAD} unzip ${input.PACKER_FILE} |
(2) Clone Packer Repo Task
This task is very straightforward. The task clones our GitHub repository into the specified local repository folder for use by later tasks
| Property | Value |
|---|---|
| Task name | Clone Packer Repo |
| Precondition | "${input.REQUIRES_PACKER}" == "true" |
| Type | CI |
| Steps | git clone ${input.GIT_REPOSITORY_PATH} ${input.REPO_FOLDER} |
(3) Packer Validation And Build Stage
Here we create a new stage so we can group all of the tasks together that will now act to ensure our end goal is reached
| Property | Value |
|---|---|
| Stage name | Packer Validation and Build |
(4) Validate Packer Config Task
Packer comes with a very useful ability to validate our configuration file before we try running it. Should validation fail, our pipeline would fail stopping us from potentially wasting time in creating a broken VM. Note that the contents in this tasks Step may look like a bit of a mess. We are passing in variables as key value pairs (key=value) into Packer. Packer will use these values, by substituting the relevant variable entry in our Packer file with the relevant key.
| Property | Value |
|---|---|
| Task name | Validate Packer Config |
| Precondition | "${input.REQUIRES_PACKER}" == "true" |
| Type | CI |
| Steps | ./packer validate -var 'vsphere_password=${var.vcenter_password}' -var 'ssh_password=${var.ssh_password}' -var 'ssh_username=root' -var 'vsphere_datastore=ds-iscsi-02' -var 'vsphere_datacenter=AutomationPro' -var 'vsphere_vcenter=aprovc1.automationpro.lan' -var 'vsphere_username=administrator@vsphere.local' -var 'cd_path=${input.REPO_FOLDER}' ${input.REPO_FOLDER}/centos-simple.json |
(5) Build Image Task
This step swaps the Packer validate switch for the build switch, instructing Packer to carry out our instructions and ultimately generate our new VM template. Before this, we carry out a find and replace function to insert the root password into the Centos7 kickstart file. We also download and add a package into our Docker container, xorriso. This package allows Packer to create our kickstart ISO file on the fly.
| Property | Value |
|---|---|
| Task name | Build Image |
| Precondition | "${input.REQUIRES_PACKER}" == "true" |
| Type | CI |
| Steps | sed -i 's/insert_rootpw/${var.ssh_password}/g' ${input.REPO_FOLDER}/cd/ks.cfg apk add xorriso ./packer build -force -var 'vsphere_password=${var.vcenter_password}' -var 'ssh_password=${var.ssh_password}' -var 'ssh_username=root' -var 'vsphere_datastore=ds-iscsi-02' -var 'vsphere_datacenter=AutomationPro' -var 'vsphere_vcenter=aprovc1.automationpro.lan' -var 'vsphere_username=administrator@vsphere.local' -var 'cd_path=${input.REPO_FOLDER}' ${input.REPO_FOLDER}/centos-simple.json |
Finally
You should now be in a position to execute your pipeline and build your first template. Congratulations! In future posts, I will look to improve on this process.
Footnote: image attribution on this post: Design vector created by macrovector